File Upload Multiple Dont Allow Upload Same Element Again
File Uploader
Uploadcare File Uploader is a responsive and mobile-set HTML5 website solution that allows users to select and upload multiple files from various sources. Besides, it includes an in-browser epitome editor. You tin customize the appearance and functionality to match your website and job.
File Uploader is supplied as a JavaScript library. It overrides an <input type="file"> control on an HTML page with a button that opens upward the File Uploader dialog. Similar this:
File Uploader Features
File Uploader helps you lot perform the post-obit tasks:
- Uploading
- Add a file uploading capability to your website or app.
- Upload files of whatever type and upwards to v TB in size.
- Get files from various upload sources, including local storage, camera, social media, and deject storage services.
- Upload multiple files in one go.
- Track upload jobs with an individual progress bar for each file.
- Speed upwardly the uploading with the uploading network (it works like CDN).
- Image Treatment
- Show prototype previews.
- Implement custom image crop options.
- Edit, enhance, and apply photo filters to images in whatever browser.
- Validation
- Validate files by their format or size.
- Automatically resize large incoming images.
- Security
- Make your uploading system compatible with SOC2, HIPAA, and more.
- Foreclose remote code execution through File Uploading.
- Prevent code execution in uploaded files like
SVG,htmlandxml.
- Reliability
- All of your uploads go to the storage covered past SLA and with a 99.9% uptime.
Supported browsers
The current File Uploader (v3) works in all mod browsers, desktop and mobile. Here's a list of supported browsers:
| Desktop | Mobile |
|---|---|
| Chrome: 37+ | Android Browser: 4.four+ |
| Firefox: 32+ | Opera Mobile: 8+ |
| Safari: ix+ | iOS Safari: 9+ |
| Edge: 12+ | IE Mobile: eleven+ |
| IE: 10+ | Opera Mini: Final |
The File Uploader will almost probably run in older browser versions besides. In case you lot need legacy browser support (IE8), try out File Uploader v2.
More on browser version support.
Installation
Select either selection to install File Uploader:
- Global installation
- NPM
Refer to no-lawmaking integrations to use File Uploader with your website platform like Shopify, etc.
Before proceeding with your install, check out the dependencies and File Uploader bundles below.
Dependencies
Uploadcare File Uploader doesn't accept whatever external dependencies except for jQuery. Generally, File Uploader comes in ii versions: with and without jQuery.
For example, y'all can use jQuery commands on the page if you lot included a package with jQuery:
var $ = uploadcare.jQuery; $ ( 'body' ) . append ( 'Information technology works!' ) ; javascript Bundles
Depending on your project, you can select a specific File Uploader JS library bundle:
-
uploadcare.full.js— a full bundle with built-in jQuery -
uploadcare.js— a default package without jQuery -
uploadcare.api.js— a package without File Uploader UI and jQuery JavaScript API only -
uploadcare.ie8.js— a full bundle with born jQuery 1.ten for IE 8 support (widget v.2.x and earlier) -
uploadcare.lang.en.js— a package without jQuery,enlocale just
Include a minified parcel version by calculation .min before .js.
By default, minified (and without jQuery) uploadcare.min.js is exported to NPM and other package managers.
Global installation
Get your Public Key in the Dashboard and include this into the <head>:
Note: If you already use jQuery, you can utilize the alternative bundle that comes without jQuery, so you won't download it twice.
Now you can use the Uploader:
<input type = "hidden" role = "uploadcare-uploader" name = "my_file_input" /> html NPM
npm install uploadcare-widget bash import uploadcare from 'uploadcare-widget' javascript You lot can get a file uploader instance and configure it with configuration object:
<input id = "uploader" type = "hidden" /> html const widget = uploadcare. Widget ( "#uploader" , { publicKey: 'demopublickey' } ) ; javascript Configure
Set of features, such as upload sources, image editing tools, tin be customized via File Uploader options. You tin have mixed settings for different File Uploader instances. Global variables volition affect all File Uploader instances, and local attributes will override global settings.
Here's how you lot tin configure File Uploader:
- Dashboard with a web UI. It generates lawmaking that you lot tin use on your page or share a link to a colleague with your config.
- Global variables, initialized on page load.
- Local attributes, initialized when a new File Uploader instance is created.
- The
settingsobject.
Global variables
Globals are specified as global JavaScript variables in your <script> tag. For example:
<script > UPLOADCARE_PUBLIC_KEY = 'demopublickey' ; UPLOADCARE_LOCALE = 'ru' ; UPLOADCARE_CLEARABLE = true ; </script > html Local attributes
Local options are specified in the target <input> tag as data-* attributes. For example:
<input type = "hidden" function = "uploadcare-uploader" data-public-central = "demopublickey" information-images-merely /> html When setting boolean options locally in HTML tag attributes, whatever value or no value is considered equally truthful:
<input data-option = "truthful" /> <input information-choice = "any-value" /> <input data-selection = " " /> <input information-option /> html To disable a local selection, use either:
<input data-pick = "faux" /> <input data-option = "disabled" /> html Settings object
Near of the File Uploader options can also exist set up within the settings object. See the JavaScript API reference for more details. For case:
<input id = "uploader" type = "hidden" /> html const widget = uploadcare. Widget ( "#uploader" , { publicKey: 'demopublickey' , imagesOnly: true , crop: '300x200' } ) ; javascript Upload Sources
File Uploader supports xiv upload sources, including local file storage, web camera; external URL; cloud services, and social networks. In UI, the sources are shown as tabs.
- Supported Upload Sources
- Dashboard
- Manual Configuration
The set of enabled upload sources is controlled via the data-tabs selection.
Start with Dashboard and select the sources yous'd similar to exit. Copy the generated lawmaking snippet.
List of supported Upload Sources
Configuring Upload Sources
You tin configure the gear up of upload sources globally or per File Uploader instance. The global parameter is called UPLOADCARE_TABS. Locally you tin can utilize the data-tabs attribute.
In both cases, you'll pass a space-separated string with tab names.
Configuring the set of sources globally:
<script > UPLOADCARE_TABS = 'url file facebook' ; </script > html Configuring the list of sources locally:
<input type = "hidden" role = "uploadcare-uploader" proper name = "my_file" data-tabs = "url file facebook" /> html Custom tabs
You tin can add custom tabs into your File Uploader. These tabs can be additional upload sources or whatever you design them to be. For example, display all uploaded files.
- Registering a new tab
- Making the custom tab work
- Adjusting the expect
- Example
Registering a new tab
Register a new tab via the registerTab method.
<div id = "uploader-placeholder" > Uploading. Please wait... </div > <script > function favoriteFiles ( container, button, dialogApi, settings ) { ... } uploadcare. registerTab ( 'favorites' , favoriteFiles) ; uploadcare. openPanel ( '#uploader-placeholder' , aught , { tabs: 'favorites file facebook dropbox gdrive instagram vk' , favoriteFiles: [ ... ] } ) ; </script > html Coding tab'due south actions
One time the tab is registered, write a custom code. The post-obit code will display uploaded images made with this File Uploader instance. It'll pass a list of file UUIDs with the settings object. When a user selects a file for uploading, the file info can be passed to the dialog using dialogApi.
role favoriteFiles ( container, push, dialogApi, settings ) { $. each (settings.favoriteFiles, part ( i, uuid ) { container. suspend ( $ ( '<img>' , { 'grade' : 'favorite-files-image' , 'src' : settings.cdnBase + '/' + uuid + '/-/scale_crop/280x280/middle/' , } ) . on ( 'click' , function ( e ) { dialogApi. addFiles ( [uploadcare. fileFrom ( 'uploaded' , uuid, settings) ] ) } ) ) ; } ) ; } javascript Adjusting the look
Customize your custom tab's look via CSS. Use <svg> and <symbol> elements:
<svg width = "0" acme = "0" fashion = " position :accented " > <symbol id = "uploadcare--icon-favorites" viewBox = "0 0 32 32" > <path d = "K 16 22.928 L 23.416 27.iv L 21.454 eighteen.965 L 28 xiii.292 L xix.37 12.552 L 16 four.6 L 12.629 12.552 L 4 xiii.292 L 10.546 eighteen.965 Fifty 8.584 27.4 Z" /> </symbol > </svg > html .uploadcare--menu__item_tab_favorites.uploadcare--menu__item_current { colour : #f0cb3c; } css Custom tab in action
Here'south a alive example of the File Uploader with the custom tab nosotros've just created. It displays images uploaded with this File Uploader instance:
Multiple File Uploading
Uploadcare File Uploader allows you to upload multiple files in one go. Each file will have its tiny progress bar and a preview when information technology's uploaded.
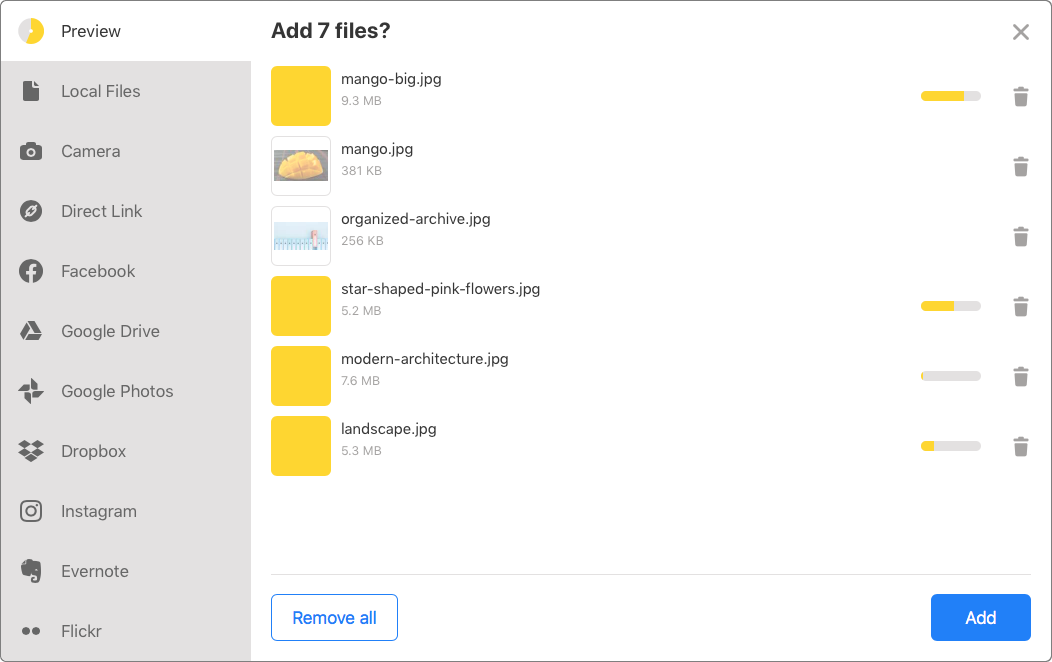
File Uploader will display individual errors if some files couldn't be uploaded (e.thou., due to size or format validation failure) and it won't affect the balance of the upload.
Enable batch uploading
Enable batch file uploading with the data-multiple aspect in the File Uploader <input> element.
<input blazon = "hidden" function = "uploadcare-uploader" proper name = "my_files" data-multiple = "true" /> html Cheque out multiple file uploading:
Multiple file uploads are stored as file groups with corresponding group_id as opposed to single file UUIDs.
Automatically resize uploaded images
Uploadcare File Uploader lets y'all accept hi-res images and compress them in size to a reasonable resolution, keeping the original aspect ratio.
Benefits of automatic paradigm resize on upload:
- Users don't need to downscale images on their devices to meet the uploading requirements.
- Optimized storage.
- Faster uploading.
Use the data-image-shrink option to utilize client-side image resize with values similar:
-
800x600, shrinks images to 0.48 megapixels with the default JPEG quality of eighty% (default, when not gear up). -
1600x1600 95%, shrinks images to 2.5 megapixels with the JPEG quality set to 95%.
Specs and limits
The output resolution limit for information-image-shrink is 268 MP (due east.yard., 16384x16384). It conforms to the maximum resolution that WebKit desktop browsers support. We recommend not to use values greater than 16.7 MP (4096x4096), because it's a current limit for iOS devices.
Uploaded images won't be shrunk in the following cases:
- When a client browser doesn't support a specified output resolution.
- For images uploaded from social media and URLs.
- If the
original resolutionis less than 2x larger than thetarget resolution. For example, it won't shrink a 2560x1560px (4 MP) image to 1600x1600px (2.five MP). It will work if you had a 2448x3264px (8 MP) input prototype. This limitation preserves an optimal image quality and file size balance. - If the epitome colour fashion is CMYK.
The output format volition exist JPEG by default unless your input paradigm has an blastoff aqueduct (transparency). In this case, PNG will be used instead. Grayscale images will be converted to RGB.
EXIF and ICC contour info is copied as-is and includes an original image orientation, camera model, geolocation, and other settings of an original prototype.
Resize to 1 MP on a customer side:
<input type = "hidden" role = "uploadcare-uploader" proper noun = "my_file" data-preview-step = " " data-image-compress = "1024x1024" /> html Resize multiple files to 0.four MP on a client side:
<input type = "hidden" role = "uploadcare-uploader" name = "my_files" data-multiple = " " data-prototype-shrink = "640x480" /> html Localization
Uploadcare File Uploader is highly customizable and implements UI localization and custom pluralization rules. With
locales, yous can make your app instantly adapt to user languages.There currently are: ar az ca cs da de el en es et fr he it ja ko lv nb nl pl pt ro ru sk sr sv tr u.k. half-dozen zhTW zh
You can either set an existing locale or add a custom 1 along with its pluralization rules.
Adding a locale
Y'all can add your localization, if there's no one notwithstanding, by forking the main File Uploader repo and adding a new localization file to this listing.
Another option is overriding specific locale items in your global File Uploader configuration:
UPLOADCARE_LOCALE = 'en' ; UPLOADCARE_LOCALE_TRANSLATIONS = { buttons: { abolish: 'Cancel' , remove: 'Remove' , choose: { files: { ane: 'Choose a file' , other: 'Pick files' } , images: { 1: 'Choose an prototype' , other: 'Load images' } } } } ; javascript The default is an English locale. If a string item is missing in a locale y'all created or customized, English will be a fallback.
Uploading errors can besides be redefined in the locale. You can see the reference here.
Pluralization rules
Pluralization rules may vary in different languages. In the English locale, in that location'll be "1 file", just "3 files". This rule is described under the file: central in the locale file.
Strings with quantitative values are based on what a pluralization function returns. You'll laissez passer a number into a part, and it'll output a subkey related to your input.
office pluralize ( number ) { // practise something return 'some_subkey' ; } javascript There are ii subkeys for the English localization: one and the other. Still, it can get more than complex with other languages. For example, take a look at the file: subkeys for the Russian locale. The %one sequence is used to format numbers into pluralized strings.
Each locale we provide with the File Uploader is supplied with its Unicode-based pluralization rules. If y'all wish to override those, you tin define a custom pluralization function and assign information technology to the UPLOADCARE_LOCALE_PLURALIZE variable.
The post-obit setting makes the File Uploader use the message under the some subkey for input numbers from two to 10:
UPLOADCARE_LOCALE_TRANSLATIONS = { file: { one: 'But one file! :(' , some: 'Only %1 files. Upload more.' , many: '%ane files!! That\'s a lot.' } } ; UPLOADCARE_LOCALE_PLURALIZE = function ( n ) { if (n === one ) return 'i' ; if (n > i && n <= 10 ) return 'some' ; render 'many' ; } ; javascript Styling
Uploadcare File Uploader can exist hands integrated into your product and friction match your website look or a web app'south UI.
Scaling File Uploader Elements
The File Uploader is designed to inherit styles from your page organically: dialog elements get scaled in line with your font size:
Times New Roman, 12px:
Courier New, 18px:
Styling With CSS
The File Uploader is thoroughly annotated with CSS classes. It's your starting indicate into deeper customization. Y'all can find a class for every File Uploader item past inspecting its elements or sifting through the File Uploader source code.
The File Uploader dialog window look can exist customized via the uploadcare--dialog form.
Changing Uploader Button Color
Changing the button color is one of the most common cases:
Button Shadow
You can add shadow and experiment with fonts and colors:
Uploading Circle Color
You tin display the file uploading progress. The fill color can be changed via the CSS color property, while edge-color volition piece of work for your groundwork.
Here, you tin can test the File Uploader with a customized uploading circumvolve:
Custom Progress Bar
You can replace the built-in progress bar. To do that, you demand to add a listener to the current File Uploader instance and get it in the onChange callback. It'll be a file object for regular File Uploaders or a group object for multiple File Uploaders. Subsequently that, listen to the progress event and change your progress bar according to the electric current uploadProgress.
The post-obit installProgressBar part does all that. It receives the two arguments: the File Uploader instance and a progress bar DOM element. Everything else runs on CSS, blitheness included.
Uploaded Image Preview
The default File Uploader behavior is to show an paradigm preview when a user selects an epitome. Yous might want to embed this preview on your page somewhere around the File Uploader button. Such a preview could be more informative than simply displaying file names and sizes.
Note, you have full control over the size and position of your embed. Merely utilise CSS.
Image preview for a multi-file File Uploader may await differently:
You can modify the displayed images or rearrange the existing ones; all changes volition then be reflected in the thumbnail listing.
File Uploader Embed
User experience means the globe to united states of america. Therefore, we provide a lot of customization options that cover both File Uploader appearance and behavior.
The look of the File Uploader can be changed via CSS, and dashboard is a swell starting signal for controlling your File Uploader behavior.
Another affair you can practice is to embed the File Uploader as a console as opposed to a default dialog window.
Embed File Uploader Using Console
By default, the File Uploader dialog appears on a button click. The dialog will announced in a lightbox, which overlays your page'due south content and dims the background.
However, yous might want to show the File Uploader interface right away. This appearance is named panel.
<div id = "uploader-placeholder" > Uploading. Delight wait... </div > <script > uploadcare. openPanel ( '#uploader-placeholder' ) ; </script > html The snippet higher up replaces your DOM element with the uploadcare-placeholder ID and puts information technology in place once a user selects a file. This tin can be used to indicate the uploading process. Also, the panel can be airtight by but selecting a file.
Panel Styling
Like to the File Uploader dialog, the panel tin can be customized.
The appearance of your embed tin can be changed via CSS. In this example, we remove a sharp border:
#uploader-styling { margin-top : 10px; } #uploader-styling .uploadcare--panel, #uploader-styling .uploadcare--menu__item, #uploader-styling .uploadcare--menu__items { background-color : transparent; edge : 0; } #uploader-styling .uploadcare--panel { flex-direction : cavalcade; } #uploader-styling .uploadcare--menu { width : 100%; height : 60px; min-acme : 60px; } #uploader-styling .uploadcare--menu__items { padding-right : 0; flex-management : row; } css Some dialog elements are rendered as iframe past Uploadcare servers, which doesn't let you lot customize CSS. However, we provide a set of specific methods to inject CSS into iframes.
Image crop
Cropping images is one of the most mutual tasks, so we added information technology right in the File Uploader UI.
Uploadcare File Uploader features a skillful bunch of crop options, including costless crop. Adding the characteristic to your File Uploader instance is done by implementing the data-crop option.
Note that it'll add together an additional step of image editing.
How Cropping Works
Technically, prototype cropping works as post-processing via the Image Processing feature:
- Original images go to an Uploadcare projection associated with a Public Key prepare as your File Uploader instance.
- The ingather is applied equally the
cropimage processing performance past injecting its URL directive into original URLs. - The File Uploader returns resulting CDN URLs with an injected
crop.
Configuring Crop
Ingather options are held inside the data-crop attribute equally a comma-separated string with presets names. When you define several presets, users volition be able to cull from the related crop options correct in the UI.
Each crop preset is a combination of a size or ratio definition and an optional keyword:
-
"disabled", crop is disabled. It tin't exist combined with other presets. -
""or"gratuitous", crop is enabled. Users can freely select any crop area on their images. -
"two:3", whatever surface area with the aspect ratio of 2:three can be selected for cropping. -
"300x200"— same as above, but if the selected expanse is greater than 300x200 pixels, the resulting image will be downscaled to fit the dimensions. -
"300x200 upscale"— same equally to a higher place, but even if the selected surface area is smaller, the resulting image gets upscaled to fit the dimensions. -
"300x200 minimum"— users won't be able to define an area smaller than 300x200 pixels. If an paradigm we utilize the crop to is smaller than 300x200 pixels, information technology will exist upscaled to fit the dimensions.
Crop examples
Free ingather:
<input blazon = "subconscious" role = "uploadcare-uploader" name = "my_file" data-ingather = " " /> html Choosing from predefined aspect ratios:
<input type = "subconscious" part = "uploadcare-uploader" name = "my_file" data-crop = "complimentary, sixteen:9, iv:3, 5:4, 1:1" /> html Fixed attribute ratio:
<input type = "hidden" function = "uploadcare-uploader" name = "my_file" data-crop = "4:3" /> html Stock-still size with upscaling:
<input type = "hidden" part = "uploadcare-uploader" name = "my_file" information-crop = "400x300 upscale" /> html Default files in Uploader dialog
Uploadcare File Uploader allows you to make specified files announced in the File Uploader dialog on open.
Specify these files by adding the value attribute to your File Uploader <input> element. The attribute may either be empty or hold a file CDN URL or UUID.
If you gear up the value externally and trigger the DOM change event, it affects the File Uploader. For instance, setting information technology to a file UUID or a CDN URL will result in that the file is loaded into the File Uploader. You can utilize information technology anytime, and it'll accept effect immediately.
Here's how yous do it:
Y'all may likewise desire to bank check out a live example:
JS snippets and CSS tricks
In this cookbook part, yous can discover pop code examples and resolutions of common tasks when working with File Uploader. Less words, more lawmaking!
Paste an image from the clipboard
const widget = uploadcare. Widget ( "[role=uploadcare-uploader]" ) ; widget. onDialogOpen ( ( dialog ) => { function uploadFromClipboard ( e ) { permit data = e.clipboardData; if ( ! !data && ! !information.items.length) { // check if clipboard data is epitome if (data.items[ 0 ] .blazon. indexOf ( "epitome" ) != 0 ) { alert ( "No image in the clipboard" ) ; return ; } permit blob = due east.clipboardData.items[ 0 ] . getAsFile ( ) ; dialog. addFiles ( "object" , [hulk] ) ; } } window. addEventListener ( "paste" , uploadFromClipboard) ; } ) ; javascript Get a CDN URL of an uploaded file
For a unmarried-upload widget.
// get a widget reference const widget = uploadcare. SingleWidget ( "[function=uploadcare-uploader]" ) ; // mind to the "upload completed" event widget. onUploadComplete ( fileInfo => { // go a CDN URL from the file info console. log (fileInfo.cdnUrl) ; } ) ; javascript Get CDN URLs of uploaded files
For a multi-upload widget.
// get a widget reference const widget = uploadcare. MultipleWidget ( "[role=uploadcare-uploader]" ) ; // mind to the "modify" event widget. onChange ( function ( group ) { // become a list of file instances grouping. files ( ) . forEach ( file => { // once each file is uploaded, go its CDN URL from the fileInfo object file. done ( fileInfo => { console. log (fileInfo.cdnUrl) ; } ) ; } ) ; } ) ; javascript Get a grouping CDN URL
For a multi-upload widget.
// get a widget reference const widget = uploadcare. MultipleWidget ( "[role=uploadcare-uploader]" ) ; // listen to the "upload completed" outcome widget. onUploadComplete ( groupInfo => { // get CDN URL from grouping data console. log (groupInfo.cdnUrl) ; } ) ; javascript Get a CDN URL of an uploaded file/group
For a dialog window.
// create a new dialog object const dialog = uploadcare. openDialog ( nil , '' , { multiple: simulated // set to true for multi-file uploads } ) ; // get a file or group case dialog. done ( res => { // once a file or group is uploaded, get its CDN URL res. promise ( ) . done ( info => { console. log (info.cdnUrl) ; } ) ; } ) ; javascript Become a camera-recorded video elapsing
// get widget reference const widget = uploadcare. Widget ( "[role=uploadcare-uploader]" ) ; let cameraRecDuration = null ; let recStart = nil ; allow recEnd = null ; // calculate webcam recording duration certificate.body. addEventListener ( "click" , e => { // user clicks "start recording" if (due east.target.classList. contains ( "uploadcare--camera__button_type_start-record" ) ) { recStart = new Appointment ( ) . getTime ( ) ; } // user clicks "stop recording" if (e.target.classList. contains ( "uploadcare--camera__button_type_stop-record" ) ) { recEnd = new Date ( ) . getTime ( ) ; cameraRecDuration = (recEnd - recStart) / 1000 ; console. log ( "Duration: " , cameraRecDuration) ; } } ) ; javascript Check if a file was added or removed
// get widget reference const widget = uploadcare. Widget ( "[role=uploadcare-uploader]" ) // become dialog object to admission its API widget. onDialogOpen ( dialog => { // listen to "file added" event dialog.fileColl.onAdd. add ( file => { panel. log ( "File added" , file) } ) ; // listen to "file removed" event dialog.fileColl.onRemove. add together ( file => { panel. log ( "File removed" , file) } ) ; } ) ; javascript Go the upload source
// become widget reference const widget = uploadcare. Widget ( "[office=uploadcare-uploader]" ) ; // listen to the "upload completed" event widget. onUploadComplete ( fileInfo => { // become source details from file information console. log (fileInfo.sourceInfo.source) ; } ) ; javascript Add an overlay to the crop
.uploadcare--jcrop-tracker::after { content : "" ; position : absolute; width : 100%; height : 100%; left : 0; /* URL of the overlay image */ background-image : url (<https://i.imgur.com/hSbF6v0.png>) ; background-size : embrace; background-position : centre; } .uploadcare--jcrop-tracker:outset-of-type { opacity : 1 !of import ; background-color : transparent !of import ; } css Get a selected crop preset
<input type = "hidden" role = "uploadcare-uploader" proper name = "my_file" id = "uploadcare-file" data-crop = "2:3, 5:6, 16:9" /> html let currentPreset = '2:3' ; certificate. addEventListener ( 'click' , due east => { // user clicks on a crop preset icon if (due east.target.classList. contains ( 'uploadcare--crop-sizes__item' ) || e.target.classList. contains ( 'uploadcare--crop-sizes__icon' ) ) { // get the caption of the preset selected currentPreset = certificate. querySelector ( '.uploadcare--crop-sizes__item_current' ) .dataset.caption; console. log (currentPreset) ; } } ) ; javascript Upload an image from Base64
// original base64 prototype const b64data = "information:image/gif;base64,R0lGODlhAQABAIAAAP///wAAACH5BAEAAAAALAAAAAABAAEAAAICRAEAOw==" ; // catechumen dataURI to a File object part dataURLtoFile ( dataurl, filename ) { permit arr = dataurl. split ( ',' ) , mime = arr[ 0 ] . match ( / :(.*?); / ) [ i ] , bstr = atob (arr[ 1 ] ) , n = bstr.length, u8arr = new Uint8Array (n) ; while (due north-- ) { u8arr[n] = bstr. charCodeAt (northward) ; } render new File ( [u8arr] , filename, {type:mime} ) ; } // convert a base64 image to a File object const fileToUpload = dataURLtoFile (b64data, "image" ) ; // upload the file to Uploadcare let upload = uploadcare. fileFrom ( "object" , fileToUpload) ; upload. washed ( fileInfo => { panel. log ( "File uploaded: " , fileInfo.cdnUrl) ; } ) ; javascript Return the uploaded image preview
// get widget reference const widget = uploadcare. Widget ( "[role=uploadcare-uploader]" ) ; widget. onUploadComplete ( fileInfo => { const preview = certificate. createElement ( "img" ) ; // create a preview of the uploaded paradigm of 200px width preview.src = fileInfo.cdnUrl + "-/resize/200x/" ; // add the thumbnail to the folio document.body. appendChild (preview) ; } ) ; javascript Add custom names to crop presets
<input blazon = "subconscious" part = "uploadcare-uploader" name = "my_file" id = "uploadcare-file" data-crop = "gratis,i:1,2:3" /> html .uploadcare--crop-sizes__item { overflow : visible; } .uploadcare--crop-sizes__item:nth-child(one)::after { content : "Free grade" ; } .uploadcare--ingather-sizes__item:nth-kid(2)::after { content : "Square" ; } .uploadcare--ingather-sizes__item:nth-child(3)::subsequently { content : "Portrait" ; } css Add custom widget push button labels
<input type = "subconscious" role = "uploadcare-uploader" id = "uploadcare-file-1" data-btn-text = "I'm the first buton" /> <input type = "hidden" office = "uploadcare-uploader" id = "uploadcare-file-ii" data-btn-text = "I'one thousand the second 1" /> <input type = "hidden" role = "uploadcare-uploader" id = "uploadcare-file-3" data-btn-text = "And I am the third" /> html // get an assortment of widget references const widgets = uploadcare. initialize ( ) ; // update each widget button text with the data-btn-text attribute'south value widgets. forEach ( widget => { widget.inputElement.nextSibling. querySelector ( ".uploadcare--widget__button_type_open" ) .innerHTML = widget.inputElement. getAttribute ( "data-btn-text" ) ; } ) ; javascript Reset widget later upload
// get widget reference const widget = uploadcare. Widget ( "[office=uploadcare-uploader]" ) ; // in one case a file is uploaded, output its URL and reset the widget widget. onUploadComplete ( fileInfo => { console. log (fileInfo.cdnUrl) ; widget. value ( null ) ; } ) ; javascript Add a custom message to the dialog
/* turn the "after" pseudo element of the dialog container's div into a hint */ .uploadcare--tab__content::after { content : "Wake upwards Neo... The Matrix has you... Follow the white rabbit🐇" ; padding : 1em; margin : 2em; groundwork-color : #000; color : #00ff00; border-radius : 5px; } css Video record time limit
const 2d = 1000 ; // record time limit const TIME_LIMIT = v * 2d ; const widget = uploadcare. Widget ( "[role=uploadcare-uploader]" ) ; widget. onDialogOpen ( ( dialog ) => { // Heed to a click on the Start button dialog.dialogElement[ 0 ] . addEventListener ( "click" , ( due east ) => { if ( e.target.classList. contains ( "uploadcare--camera__button_type_start-record" ) ) { const stopBtn = dialog.dialogElement[ 0 ] . querySelector ( ".uploadcare--camera__button_type_stop-record" ) ; // Diasplay countdown on Stop button permit remaining = TIME_LIMIT ; stopBtn.innerText = ` Stop (in ${remaining / 1000 } s) ` ; let counter = setInterval ( ( ) => { remaining -= 1000 ; if (remaining <= 0 ) { clearInterval (counter) ; } stopBtn.innerText = ` Stop ( ${remaining / one thousand } south) ` ; } , 1000 ) ; // Click Cease button (terminate recording) afterward TIME_LIMIT setTimeout ( ( ) => { stopBtn. click ( ) ; } , TIME_LIMIT ) ; } } ) ; } ) ; javascript Versioning
When nosotros introduce backward-incompatible changes, we release new major versions. In one case published, such versions are supported for ii years. You will still be able to utilize whatsoever file uploader version after its support term at your own adventure.
| Version | Date Published | Supported Until |
|---|---|---|
| three.x | 28 Jun 2017 | TBD |
| two.x | xx Feb 2015 | 1 Jan 2020 |
| 1.x | 21 Mar 2014 | 1 Jun 2019 |
| 0.ten | 6 Sep 2012 | 1 Jun 2019 |
merryleespons1954.blogspot.com
Source: https://uploadcare.com/docs/uploads/file-uploader/
0 Response to "File Upload Multiple Dont Allow Upload Same Element Again"
Post a Comment